If you are setting up your online store using WooCommerce or have some questions or difficulties with shipping settings, this article will solve all of your problems.
We have prepared a complete guide that will guide you through the basic settings and some of the most advanced features available by installing additional plugins.
Enjoy reading!
Before we start…
What if we tell you that you can forget about setting up the shipping steps in WooCommerce cause all the manual process TAKES FOREVER?
YES! You’ve heard us right.
Sendcloud Woocommerce plugin helps you to integrate with different delivery companies in less than 5 minutes and once you set it up you can optimize the whole shipping process.
And the good news is you don’t need any coding skills at all…
By connecting your WooCommerce store with Sendcloud, you can immediately start shipping with different carriers and offer flexible options to your consumers.
And that will save you a hell of time and work!
The great part is, by combining different shipping methods and including proper shipping costs, your customers can choose how to get their delivery.
Moreover, you can immediately generate the right shipping labels for the right shipping methods. So, you can process your orders at the right time without any manual effort.
Don’t forget that flexible delivery means happy customers – and happy customers mean increased conversion rates.
It’s cool, isn’t it?
Well if you want to learn more about it, you should check this out!👇
Table of content – what you can expect
- WooCommerce shipping: shipping menu
- WooCommerce shipping: shipping classes
- What are shipping zones within WooCommerce?
- How to add shipping methods in WooCommerce?
- Forget the manual work: How to set up the WooCommerce Sendcloud plugin?
- WooCommerce Shipments: general settings
- How to manage WooCommerce shipping costs by weight
- How to manage WooCommerce shipping costs based on a cart value
- How to manage WooCommerce shipping costs based on the number of products in the cart
- How to connect PostNL, DHL and other carriers to your WooCommerce store
Shipping WooCommerce: shipping menu
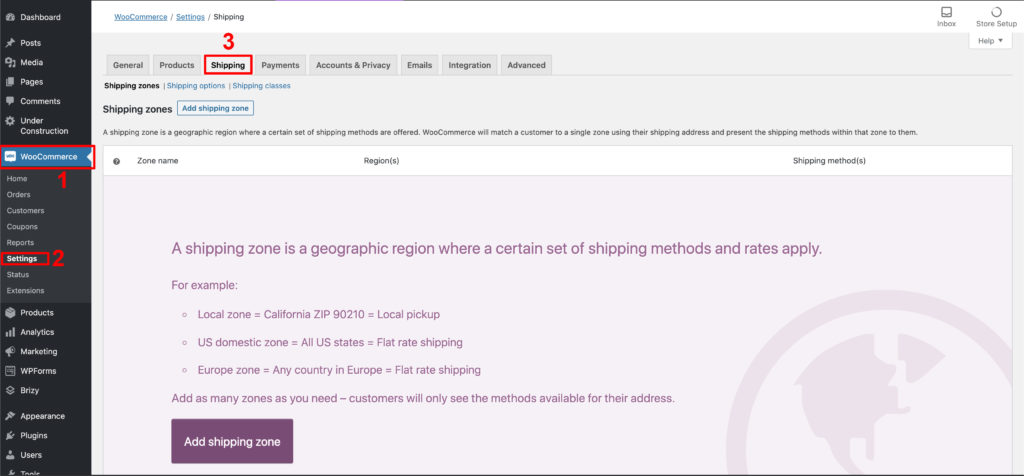
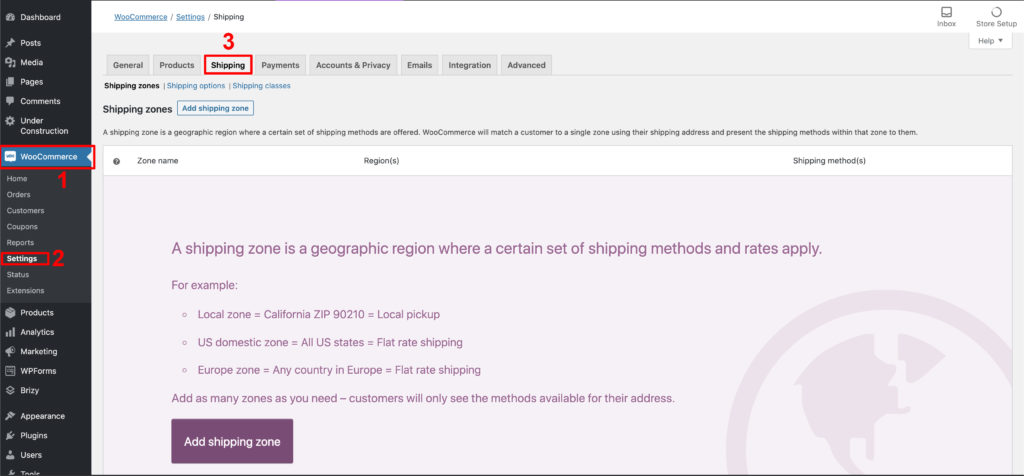
Accessing the shipping options of WooCommerce is very simple, in just 3 clicks you’re there. From the WordPress, Dashboard, click on “WooCommerce” > “Settings” > “Shipping”.”
There you go, welcome to the shipping menu of WooCommerce. From here, you can access all the necessary options for the management of shipping prices.
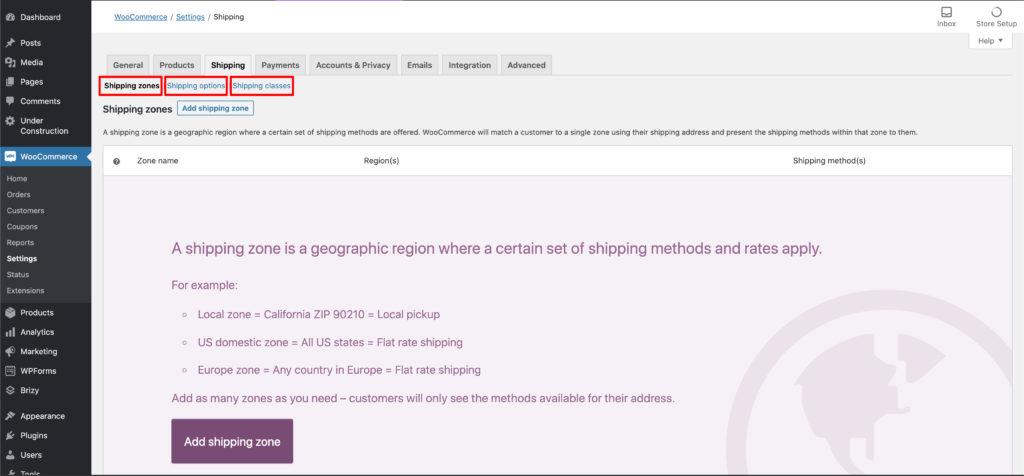
As you can see, the shipping settings are in turn divided into three subsections:
- Shipping zones: This allows you to set the shipping zones and shipping methods from which your customers can choose when ordering.
- Shipping options: here you can find some of the general shipping settings.
- Shipping classes: in this section, you can create shipping classes to assign to your products. Creating shipping classes allows you to have more flexibility in managing rates.
Products’ shipping classes affect the options available when you set the shipments within the shipping zones. Therefore, we will start explaining to you how to set the shipping types.
After that we will move on with the shipping zones, followed by the general settings.
Woocommerce shipping: shipping classes
The type of shipping classes you define are dependent on the type of products you ship. It’s an easy way to manage extra costs related to specific products or manage special rates of particular product categories.
How to create a new shipping class
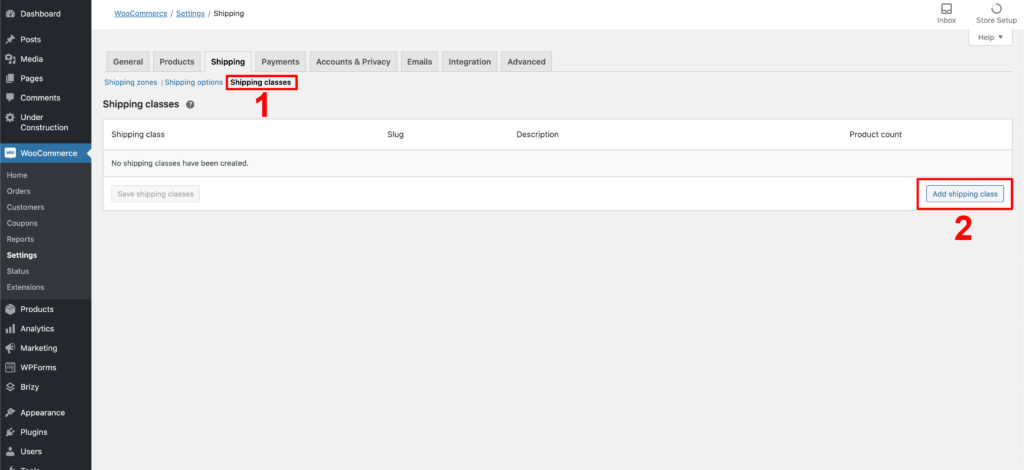
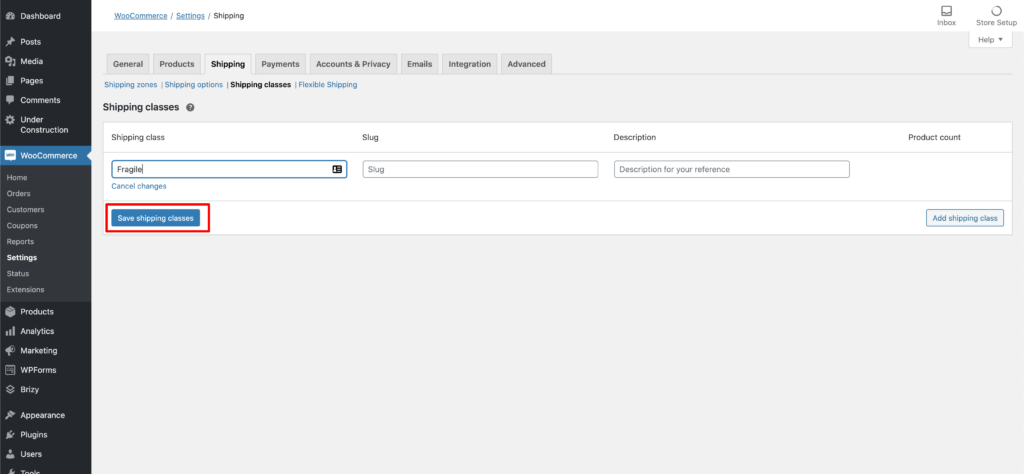
To create a new shipping class, click on “Shipping classes” and access the shipping classes section. Next, click on “Add shipping class” to create a new one.
Enter the shipping class you would like to add; you can add as many as you want. After entering all the classes, you need to click on “Save shipping classes” to save the changes.
In our example, we used the word “fragile.” A product with the shipping class “fragile” needs more packaging and takes longer to pack. Creating this shipping class allows us to add these extra costs to the basic shipping.
Example aside, the variety of shipping classes you can create is endless and depends a lot on the type of products you sell and the type of shipment you use.
Additionally, shipping classes will come in handy later to manage shipping costs based on your cart’s number of products.
How to assign a shipping class to your product
After creating shipping classes, you have to connect them to your products.
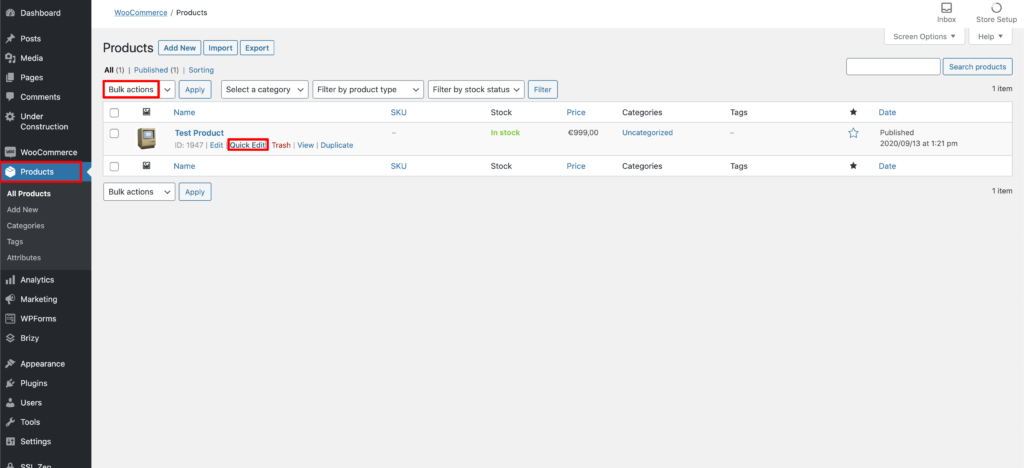
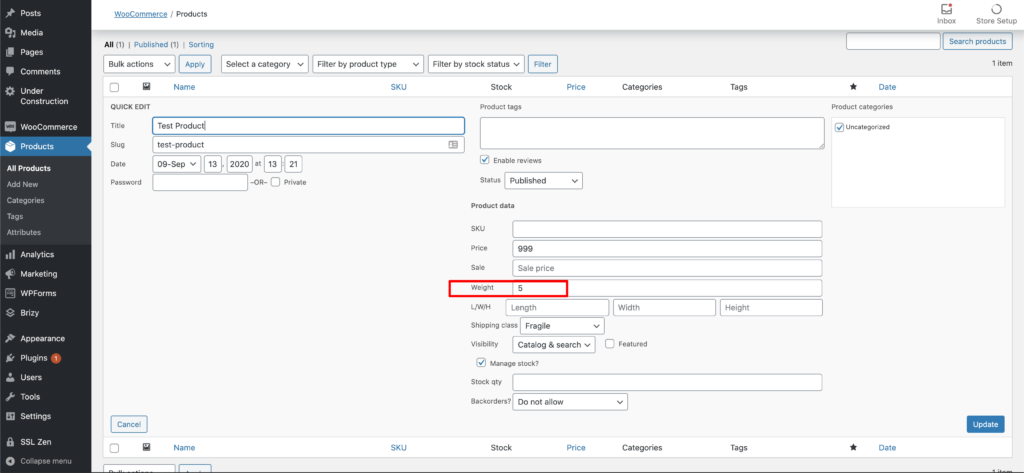
To do so, just click on “Products.” If it is a single product (as in our case), you can click on “Quick Edit” and modify it in one click. If it’s multiple products, you have to select all the products you want to change and click on “Bulk actions” > “Edit.”
Once you are inside the product edit menu, click the “Shipping class” drop-down menu and select the shipping class you want to assign to the product. Apply the changes by clicking on the update button.
Now that you have arranged the shipping classes, you can proceed to setting the shipping zones and examine the various settings.
What are shipping zones within WooCommerce?
The next step is to set shipping zones. But what are shipping zones?
A Shipping Zone is a geographical area to which you ship your products. Shipping Zones can be set up in regions and zip codes, but it’s also possible to use them on a more general level.
Each of your clients only see one zone that’s available to them. The shown Zone is the one to which they belong based on their address.
How to set shipping zones within WooCommerce
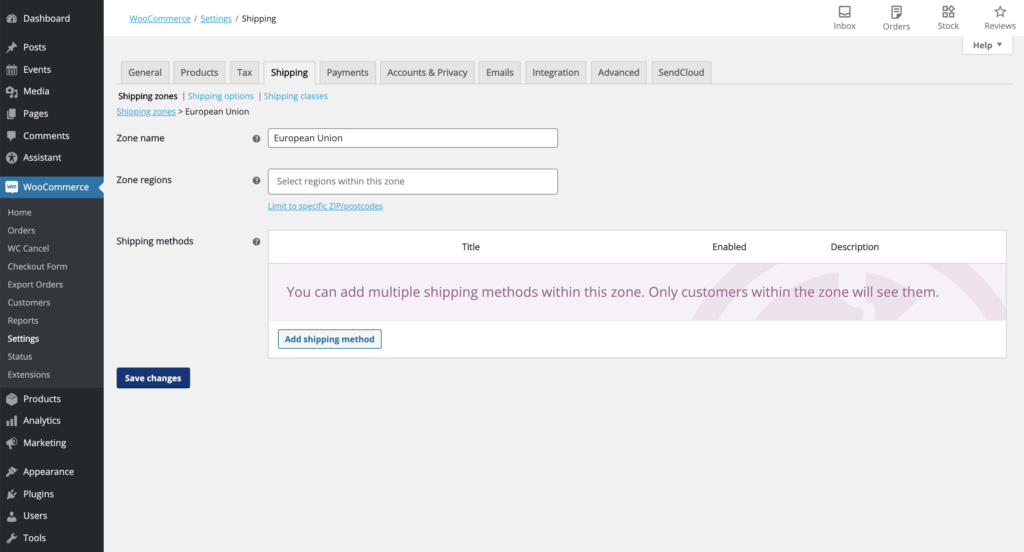
To set these shipping zones, you will have to return to the WooCommerce shipping menu. From the WordPress Dashboard click on “WooCommerce” > “Settings” > “Shipping” > “Shipping zones”.
At this point, just click on the “Add shipping zone” button and proceed with creating the zone.
Name of shipping zones in WooCommerce
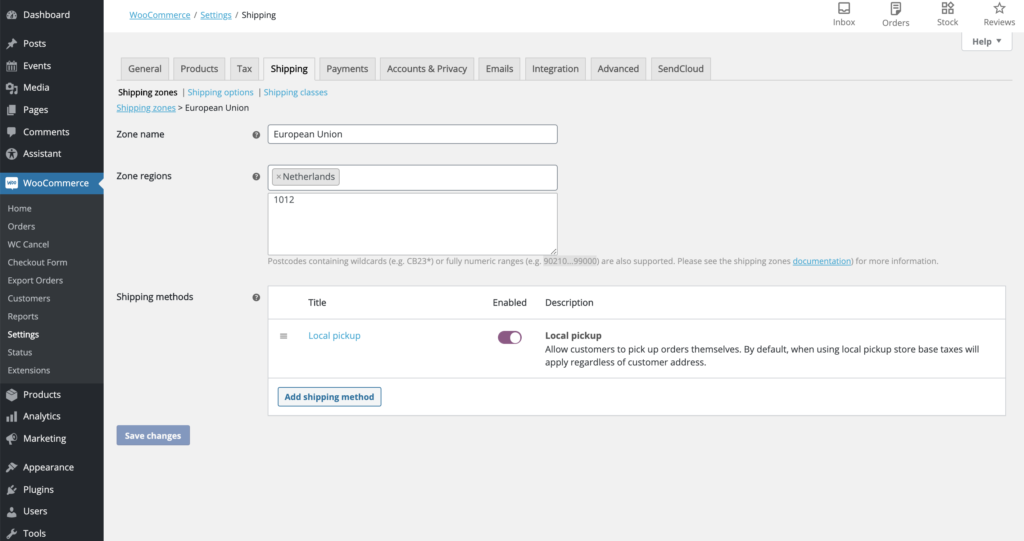
The first thing to add is the name of the Shipping Zone. How to organize the zones depends on your shipping management and the agreements you have with the couriers. In this case, we will create the European Union zone
Regions of the shipping area in WooCommerce
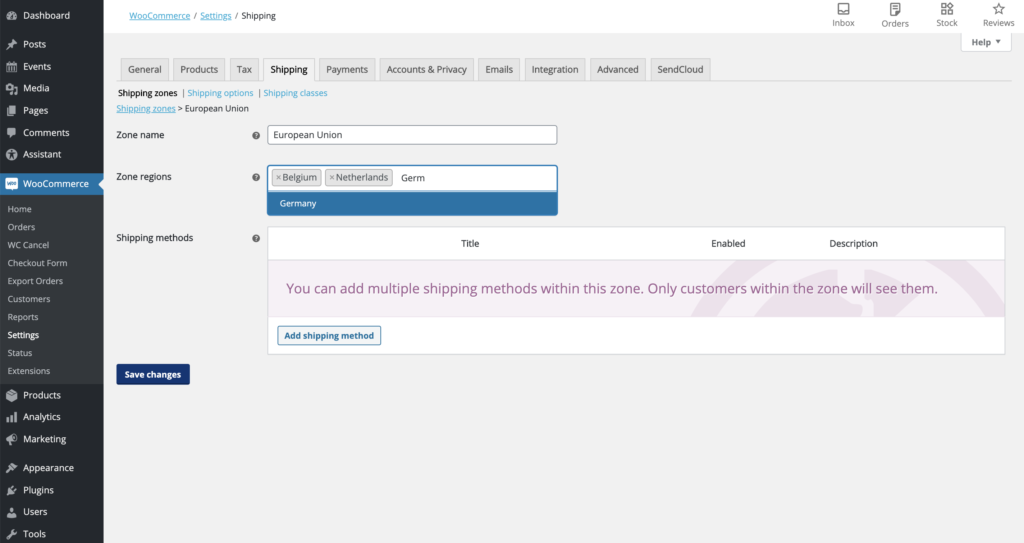
After creating the zone, you can proceed to enter as many regions as you’d like.
In our example, we have created a zone with multiple countries, but you may decide to make a zone with only one country to handle specific shipping options. We will see an example in more detail in the next section.
How to add shipping methods in WooCommerce?
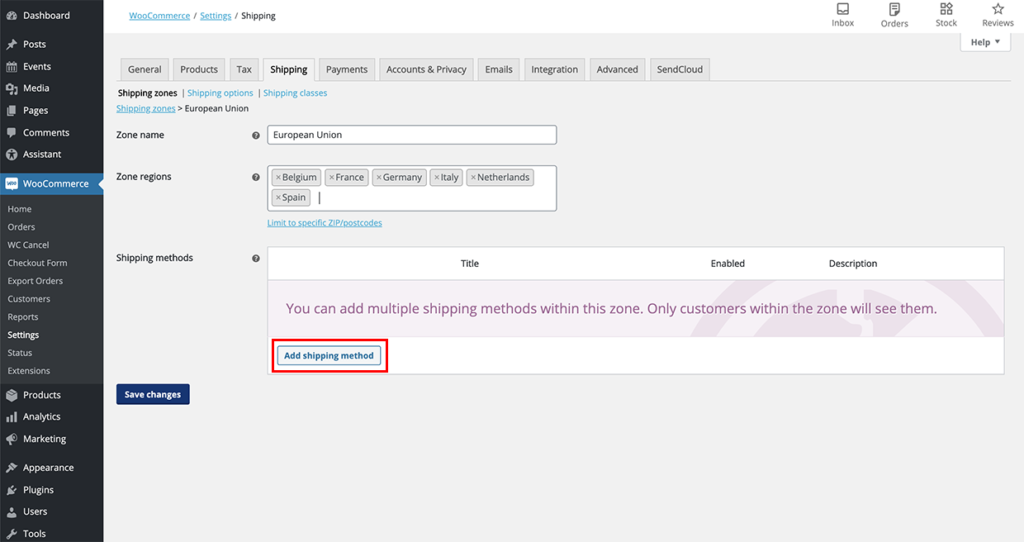
After setting the zone name and adding the countries or regions that you would like to add, it is time to create the shipping methods attributed to that zone.
Click on the “Add shipping method” and proceed!
The basic version of WooCommerce allows you to choose between three shipping methods.
We will explain them one by one below.
But before diving into the details, let us give you a sneak peek of how to eliminate all the manual work and get everything easily fixed with the Sendcloud WooCoomerce plugin.👇
Sendcloud enables you to integrate with carriers and once you set it up you can immediately offer flexibility within your checkout.
For example, you can enable multiple carriers and offer nominated day delivery for more than one carrier.
Meaning that you’ll be offering maximum flexibility that allows your customers to plan exactly which day they want to receive their parcels.
You can even offer same- and next-day delivery on your own terms depending on the time you have your pick-up scheduled or you drop off the parcels yourself.
Now let’s have a look at how to integrate WooCommerce with Sendcloud.
Forget the manual work: How to set up the WooCommerce Sendcloud plugin?
With Sendcloud, can optimize your shipping process with a no-code checkout plugin.
And once you set it up, you can immediately offer flexibility based on your own checkout processes.
Here are the steps you should follow to set up your optimized checkout with the Sendcloud WooCoomerce plugin.
For more details, please visit this page.
1) Install the checkout feature for WooCommerce
Go to your WooCommerce backend at plugins, install the Sendcloud plugin and ensure that you enable auto-updates.
2) Create delivery zone(s)
Configure your checkout in Sendcloud by adding “new delivery zone(s) and you can add multiple delivery methods for your customers with an address in that zone.
3) Choose your delivery methods
Now you can add delivery methods: standard delivery, same- and/or next-day delivery and nominated day delivery. You can also select the carrier shipping options you want to enable in your checkout.
4) Add pricing to your checkout in WooCommerce
Add pricing to your shipping zones at “Shipping Class Costs” in the “Shipping Methods” and decide to enable free shipping or not.
5) Optional: style the widget to reflect your brand
If you want to restyle the checkout widget, navigate to the appearance menu in WooCommerce, click customize and go to additional CSS.
And that’s it! Your customers will now be able to select flexible delivery methods and see the associated delivery fees.
If you want to know more about Sendcloud and the WooCommerce checkout feature, create a free account and see how it can really benefit your business.
Flat rate shipments in WooCommerce
“Flat Rate Shipping” is a shipping method in WooCommerce that allows you to define a standard rate per item, shipping class or per order. It works easily with “Product Shipping Classes”, to group products of a similar type.
After selecting the “Flat rate,” click on the “Add shipping method,” so you can proceed to customize it. To customize your flat rate, move the mouse cursor closer, and “Edit” will appear.
By clicking on “Edit” this box will appear.
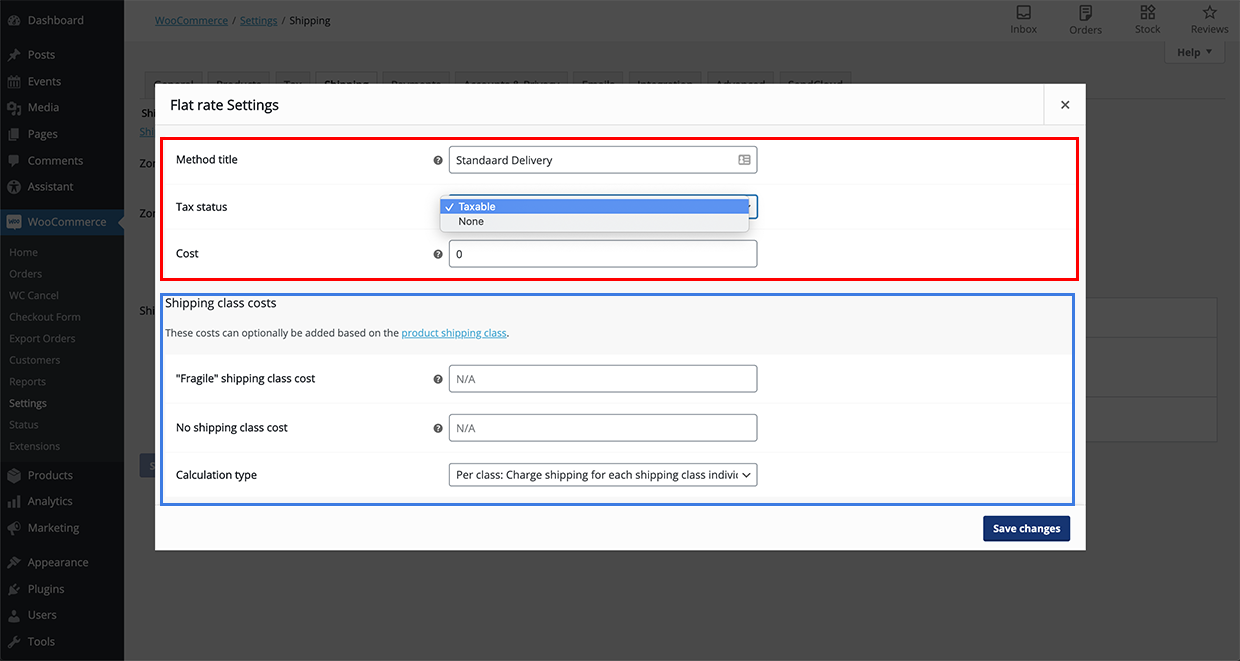
The “Method title” was originally “Flat rate”, but in our example we changed it to “Standard Shipping”. This is also the name that will be displayed to your customers when they select their preferred shipping method in their checkout.
In ‘Tax Status’, you can find a drop-down menu where you can enable or disable taxation. If you decide to do so, the ‘Cost’ field allows you to enter the base price.
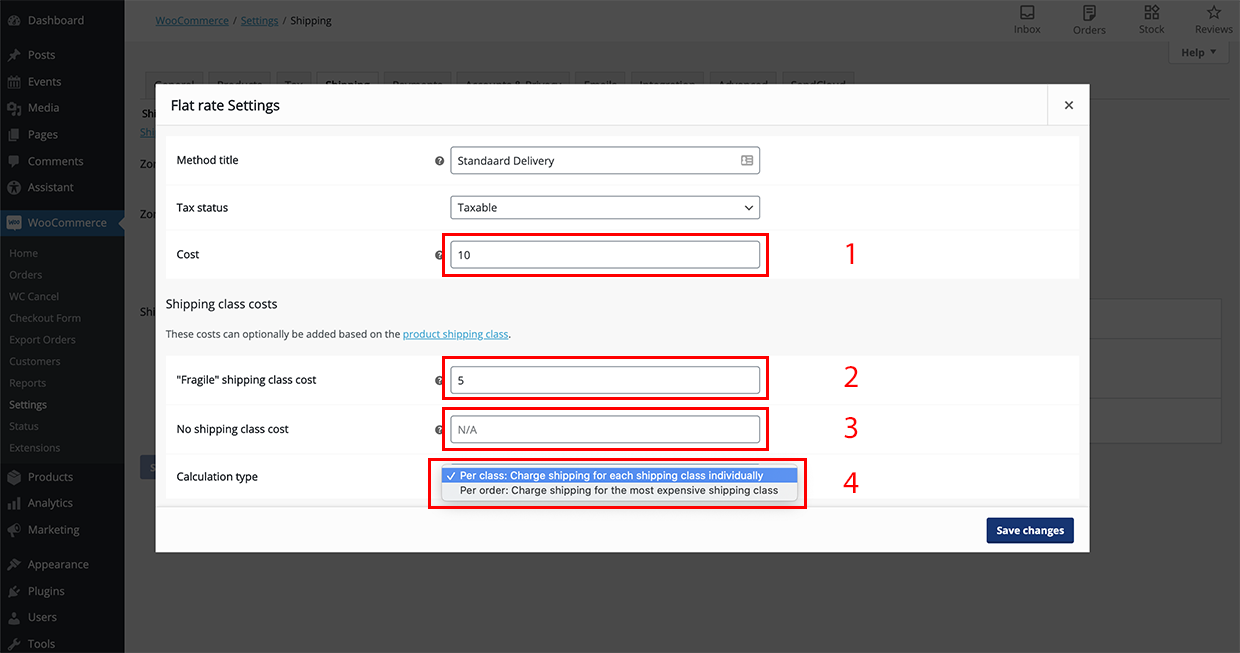
The highlighted part #4 below, only appears if the shipping classes have been set. That is exactly the reason why we recommend you to first set your shipping classes before adding your shipping zones. This will avoid the confusion of going back and forth between the settings.
Now let’s see what these fields are for.
Field 1 “Cost” is the basic cost to which the shipping classes will be added. In this case, if a customer purchased a “fragile” item (field 2) his total shipping costs would amount to 15 euros.
Field 3 “No shipping class cost” allows you to assign a value in case the purchased object has no cost classes. This is necessary when there is no value set.
In field 4 you can tell the system to implement the shipping cost for each product in the consumers’ cart, or whether to charge the shipping cost only to the product with the highest value.
Based on the type of products you ship and the agreements you have with your delivery company, this section can be managed in many different ways. Some e-commerce stores, for example, do not enter any value in field 1 and manage all expenses through cost classes.
For each area you can create more than one shipping method to give your customers different options to choose from when purchasing their order.
In addition to the fixed rate, WooCommerce allows you to offer free shipping (Free shipping) or pickup on site (Local pickup). The steps to access these settings are identical to those we have just seen, so in the next sections we will focus only on the options offered by each of these shipping methods.
Free shipping with WooCommerce
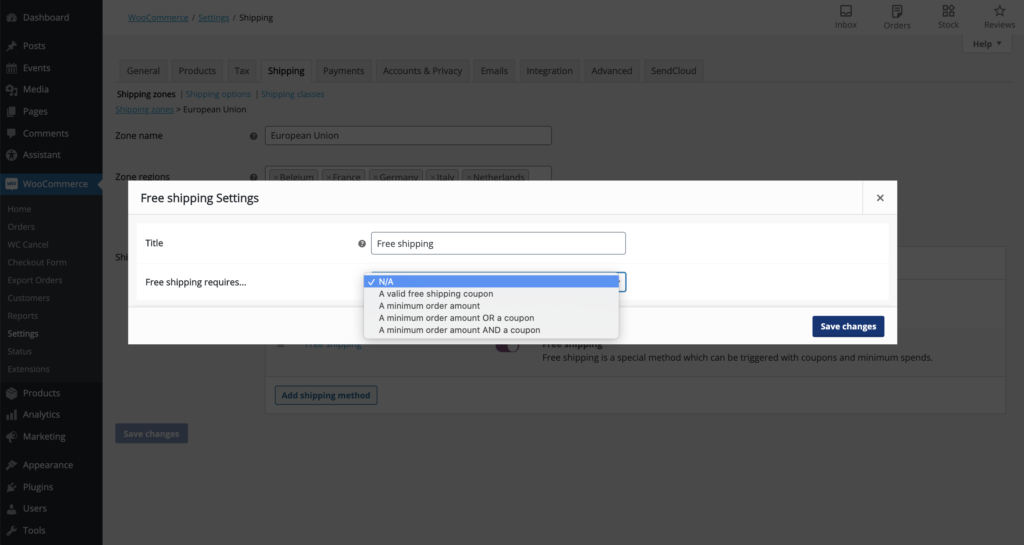
When selecting “Free shipping” and clicking on “Edit” the following screen will appear:
From here you can adjust or change the name of the shipping option and set the conditions that make free shipping available to your customers.
If you do not set any conditions(N/A), free shipping will be applied by default for the selected area. If you have very low shipping prices it can be a good strategy to include them directly in the cost of the products and always offer free shipping.
It’s an old psychological trick: even if the final price is the same, not having to pay ‘extra’ for shipping costs often leads to an increase in conversions.
Alternatively, you can enter one of the following options:
- Free shipping only if the customer has a promotional code.
- Free shipping if the customer’s order exceeds a certain value.
- Free shipping if the customer’s order exceeds a certain value and the customer is in possession of a promotional code.
- Free shipping if the customer’s order exceeds a certain value OR the customer is in possession of a promotional code.
In-Store/Local Pickup with WooCommerce
The last available standard option is the local pickup.
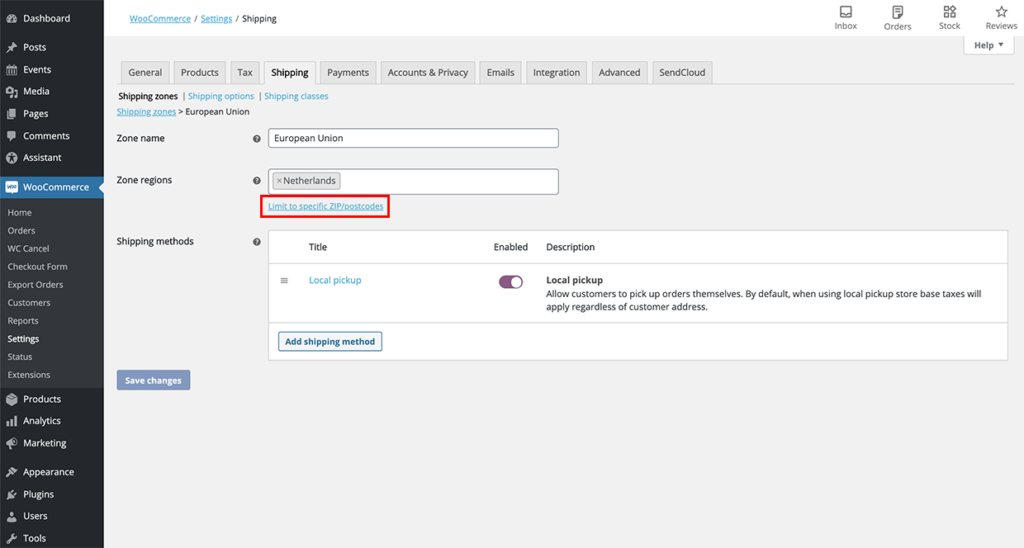
Here, there are not many options available except to indicate tax and to establish the costs. However, there is a functionality in the shipping zones settings which can be very useful for the pickup options. In the shipping zones settings, you can restrict the pickup method to a specific zip code.
By clicking on this option you will be able to make the on-site pickup available only to customers close to your warehouse.
In this case we have inserted the general zip code of Milan, Italy. We could enlarge the area by adding additional neighbouring postal codes or narrow it down by inserting more specific postal codes.
WooCommerce shipments: general settings
Now that you have seen the main features needed to manage shipments, we can take a look at some of the general settings that can be changed according to your needs.
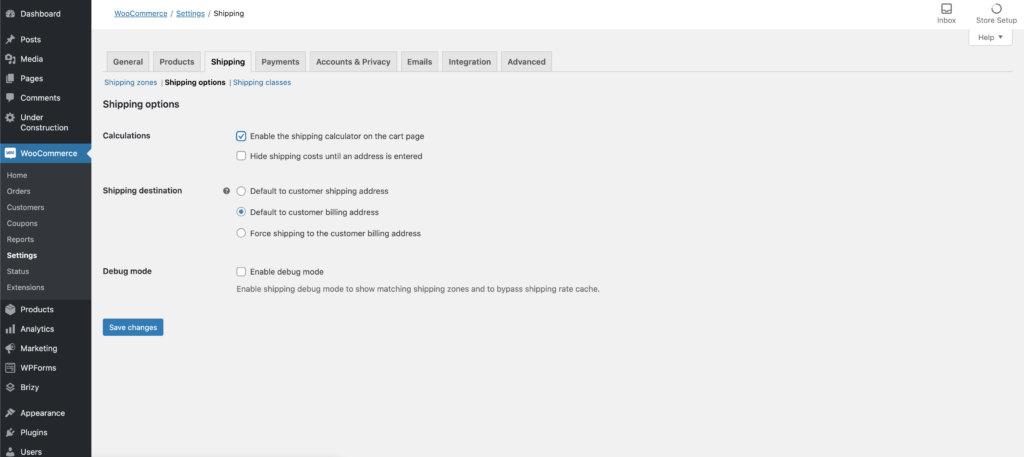
From the WordPress Dashboard click on “WooCommerce” > “Settings” > “Shipping” > “Shipping options”.
Here it may be useful to change some of the settings.
“Hide shipping costs until an address is entered” hides the cost calculation from your customers until the destination address is entered. It is a very useful feature to avoid errors and misunderstandings.
“Default to customer shipping address” is another useful setting to avoid errors. It causes your customers to be asked to specify the shipping address. If this option is not selected, the system assumes that the billing address and shipping address are the same.
Finally, while setting the shipping zones, it may be useful to activate the “Enable debug mode” option to avoid cache errors.
You should know that WooCommerce tries to recalculate the shipping costs as little as possible because it is a complex operation that weighs heavily on the resources of the site, so unless you make some changes about the shipping location, WooCommerce retrieves the shipping data from the browser cache instead of recalculating them each time.
This does not lead to problems when all of the settings are set in the correct way and guarantees your customers a better browsing experience, but it could lead to some false errors when testing these settings.
Activating the debug mode makes WooCommerce recalculate all costs every time the cart is updated regardless of the parameters that have been changed.
This way you can be sure that every result you get from the system is updated to the latest changes you have made.
Just remember to deactivate the debug mode when the system is set up!
This part concludes the overview of the basic functions of WooCommerce. Now we can proceed to examine some advanced features accessible through the installation of plugins.
How to manage WooCommerce shipping costs by weight
If your store can benefit from being able to calculate shipping costs by weight, this is the section for you.
The basic version of WooCommerce does not provide this option but we can easily overcome this problem by installing a plugin. There are different plugins you can go for; some are paid, others are free.
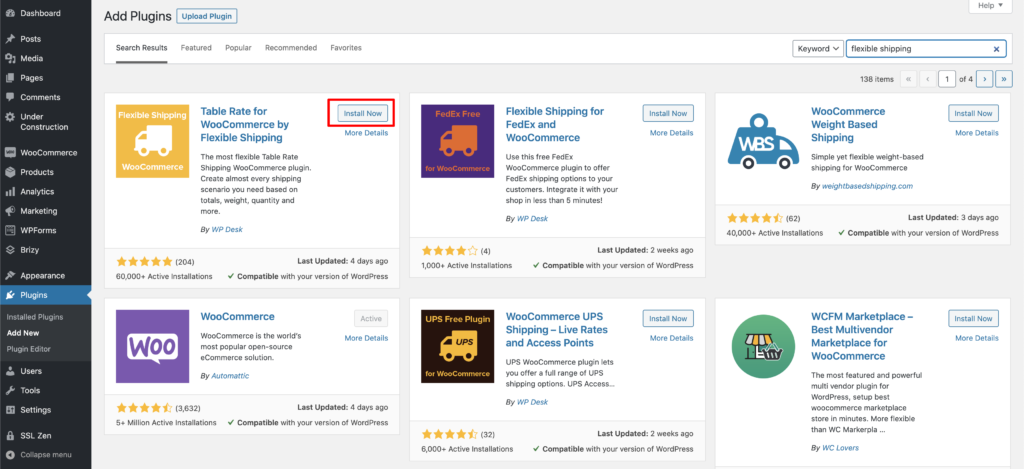
In this guide we will use Flexible Shipping because, in addition to being a great plug in, the free version of Flexible Shipping allows you to set your shipping costs based on weight. First, you will need to install the plugin. From the WordPress Dashboard click on “Plugins” > “Add New” and search “Flexible Shipping”.
Install and Activate the plugin.
Before proceeding any further we must attribute the weight to each product.
To do so simply click on “Products”.
If it is a single product (as in our example) just click on “Quick Edit” and modify it, otherwise you just have to select all the products you want to modify and click on the command “Bulk actions” > “Edit”.
Once inside the edit menu make sure that the weight field contains the correct value for the product(s).
Now, with the correct weights and the plugin installed, you can proceed to create a new shipping method based on weight!
Let’s go back to the shipping zone settings. From the WordPress Dashboard click “WooCommerce” > “Settings” > “Shipping” > “Shipping zones”.
Here you can edit one of the zones you have already created or create a new one. This is the same process as shown in the section about how to set the shipping zones.
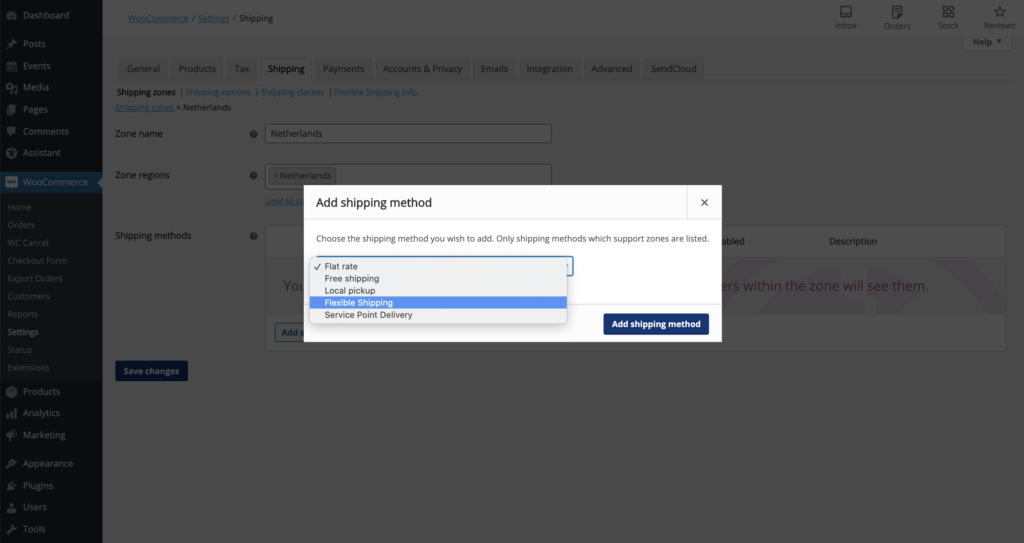
When adding a new method, a new option is available, because of the plugin that is installed.
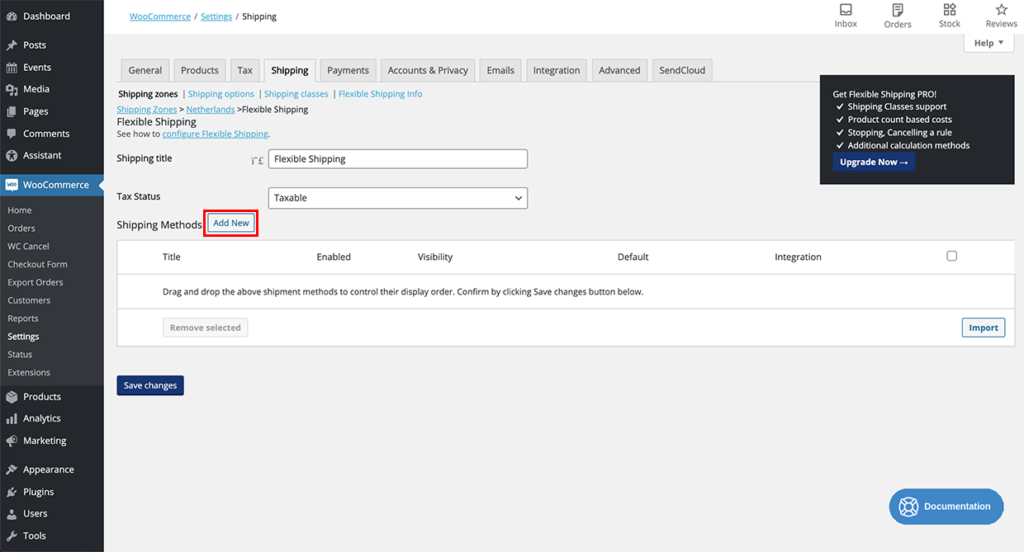
Add Flexible Shipping to your shipping methods and let’s see together how to configure it.
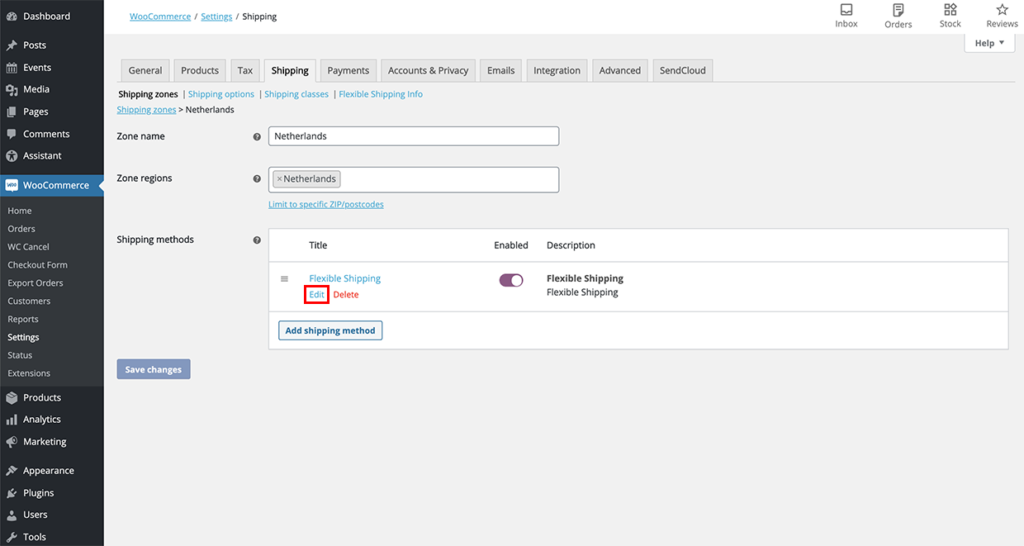
As for the other methods, bring the mouse cursor closer so the edit message appears and find out what options are available now.
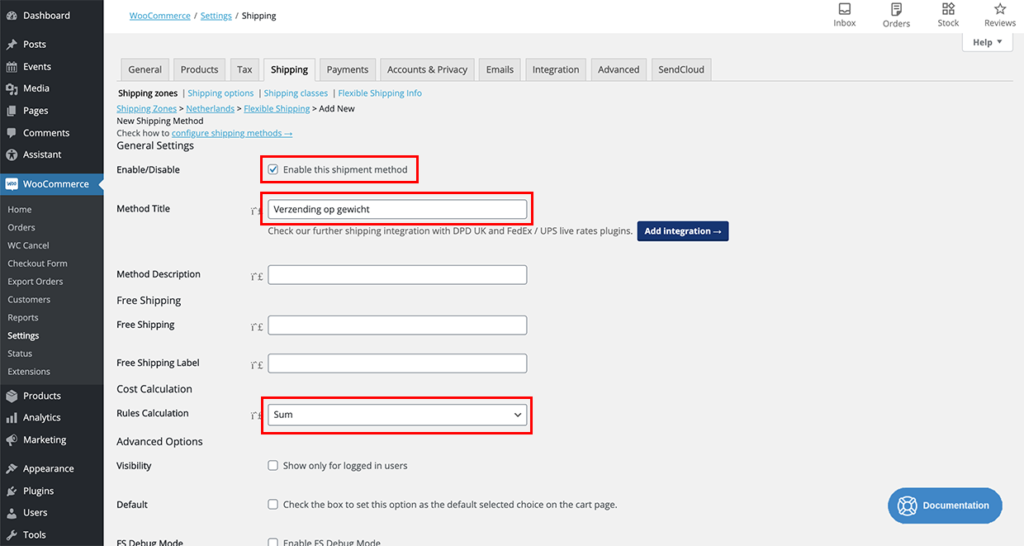
Inside the plugin, the first thing to do is, to create a new calculation method for shipping costs.
Be sure to check the “Enable this shipment method” flag and give it the name you prefer. In this example we have given it the following name: “Shipping by weight”. The “Sum” calculation rule will calculate the value of the variables for all the objects in the cart.
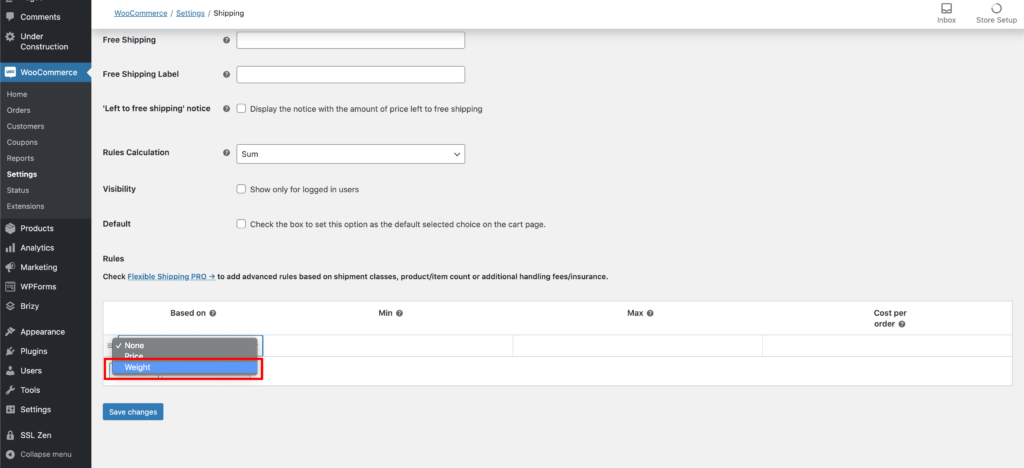
Now you just have to scroll down and set the pricing rules.
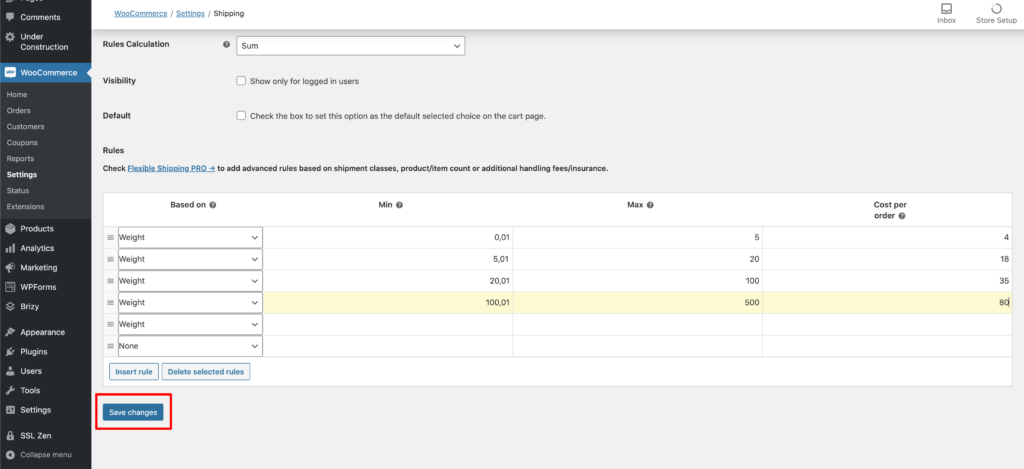
The free version of Flexible Shipping allows you to set shipping prices based on weight and price. Select weight several times so you can create all the cost ranges you need.
In the example above we have set some weight ranges with their price. For a shipment up to 5 kg the cost is 4 euro, between 5 kg and 20 kg is 18 euro, and so on. All you have to do is replace the figures in our example with the rates provided by your courier and you’re all set.
How to manage WooCommerce shipping costs based on cart value
Do you prefer to manage shipping costs based on the value of the cart? That’s no problem. The free version of ‘Flexible Shipping’, the plugin used to manage shipments by weight, is also able to manage shipments by the prices of the goods ordered.
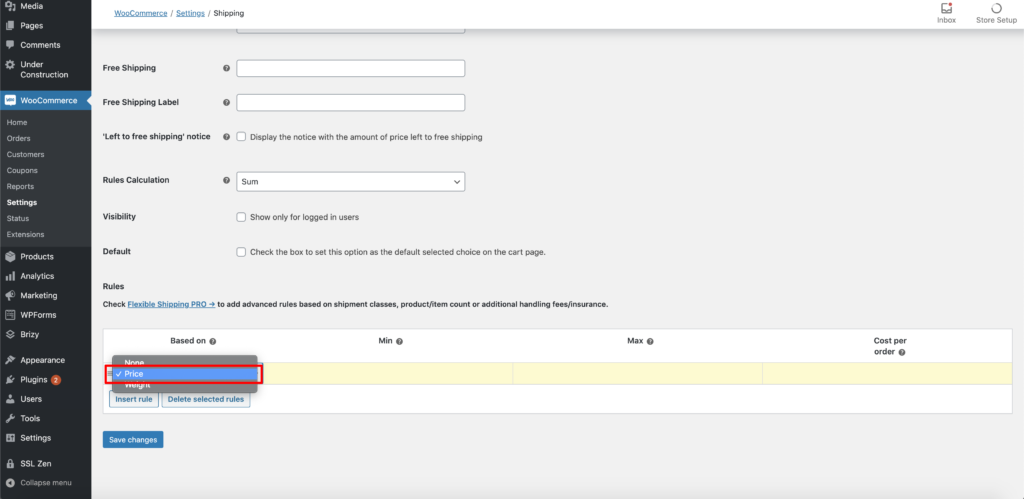
Just repeat the steps for the installation and when creating the rules select “Price”.
The next step is to create all the necessary rules according to your price range and you are ready to ship right away.
How to manage WooCommerce shipping costs based on the quantity of products in the cart
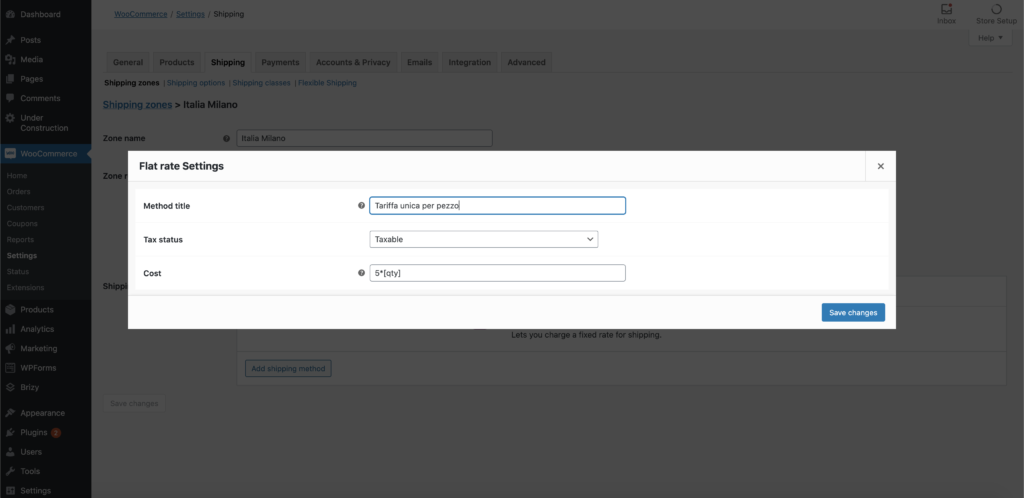
If your shipping costs depend on the amount of products that your customers add to their cart, the solution is quite simple and is linked to this formula:
- X*[qty]
By replacing X with the shipping cost per single product the system will multiply it by the number of products in the cart. You can do this by setting a single rate payment.
In this way the 5 euro shipping cost will be multiplied by the number of products in the cart. It might be useful for multicollo shipments.
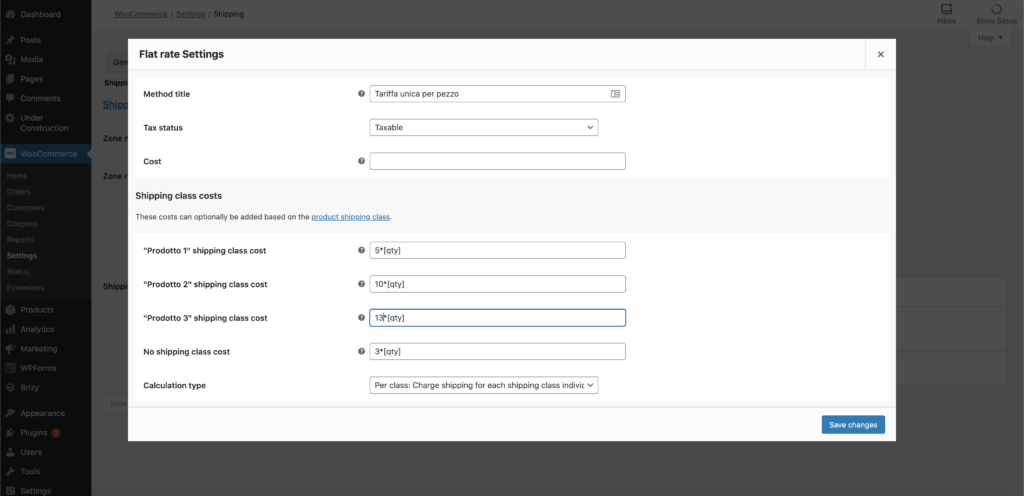
If you need to introduce a variety of prices depending on the product you can do so by setting dedicated shipping classes. Leaving the general cost field empty you can assign the costs of each product directly from the shipping classes.
How to connect PostNL, DHL and other carriers to your WooCommerce store
Now that your customers can have their goods shipped in every possible and imaginable way, it’s time to decide how to ship them.
Which carriers to choose for your WooCommerce store
When it comes to shipping carriers, there are many different options and it’s not always easy to decide who to partner up with. After all, delivery is a key link in your customer satisfaction chain, and it is a very important link because only satisfied customers come back.
PostNL, DHL and more carrier WooCommerce plugins
After choosing a delivery partner, with WooCommerce you can give your customers the opportunity to choose between the shipping options offered by the courier directly during the order. Just install the appropriate plugin.
Some carriers (like DHL) have developed their own plugins, others (like FedEx and UPS) rely on third-party software.
By installing the plugin you can access the carrier services directly through your e-commerce by entering your credentials in the settings, then you can decide which services you want to offer.
When the whole process is completed, your customers will be able to select the type of shipment they want and receive in real time the calculation of shipping costs directly from the carrier.
Some of these plugins will allow you to print documents and labels for shipping directly through WooCommerce.
Complete solution for shipments with WooCommerce via Sendcloud
If all these options do not solve the fact that you are too busy with marketing your online store and that all of your time is already spent optimizing your product offerings, you can also install the Sendcloud plugin for free.
Sendcloud can help you fully automate the shipping process of your business and makes sure it is no longer a problem. The only thing your employees have to do is to apply the shipping label on the right parcel.
The plugin already helps over 15,000 online retailers to optimize their shipping process by flexible shipping methods in the checkout, automated picking, packing and shipping options and a hassle free returns process for both you and your clients.
Curious to see how it works? Request your free demo or sign-up for free, so you can start saving minutes on every order. The revolution of shipping with WooCommerce is just a few clicks away!
